
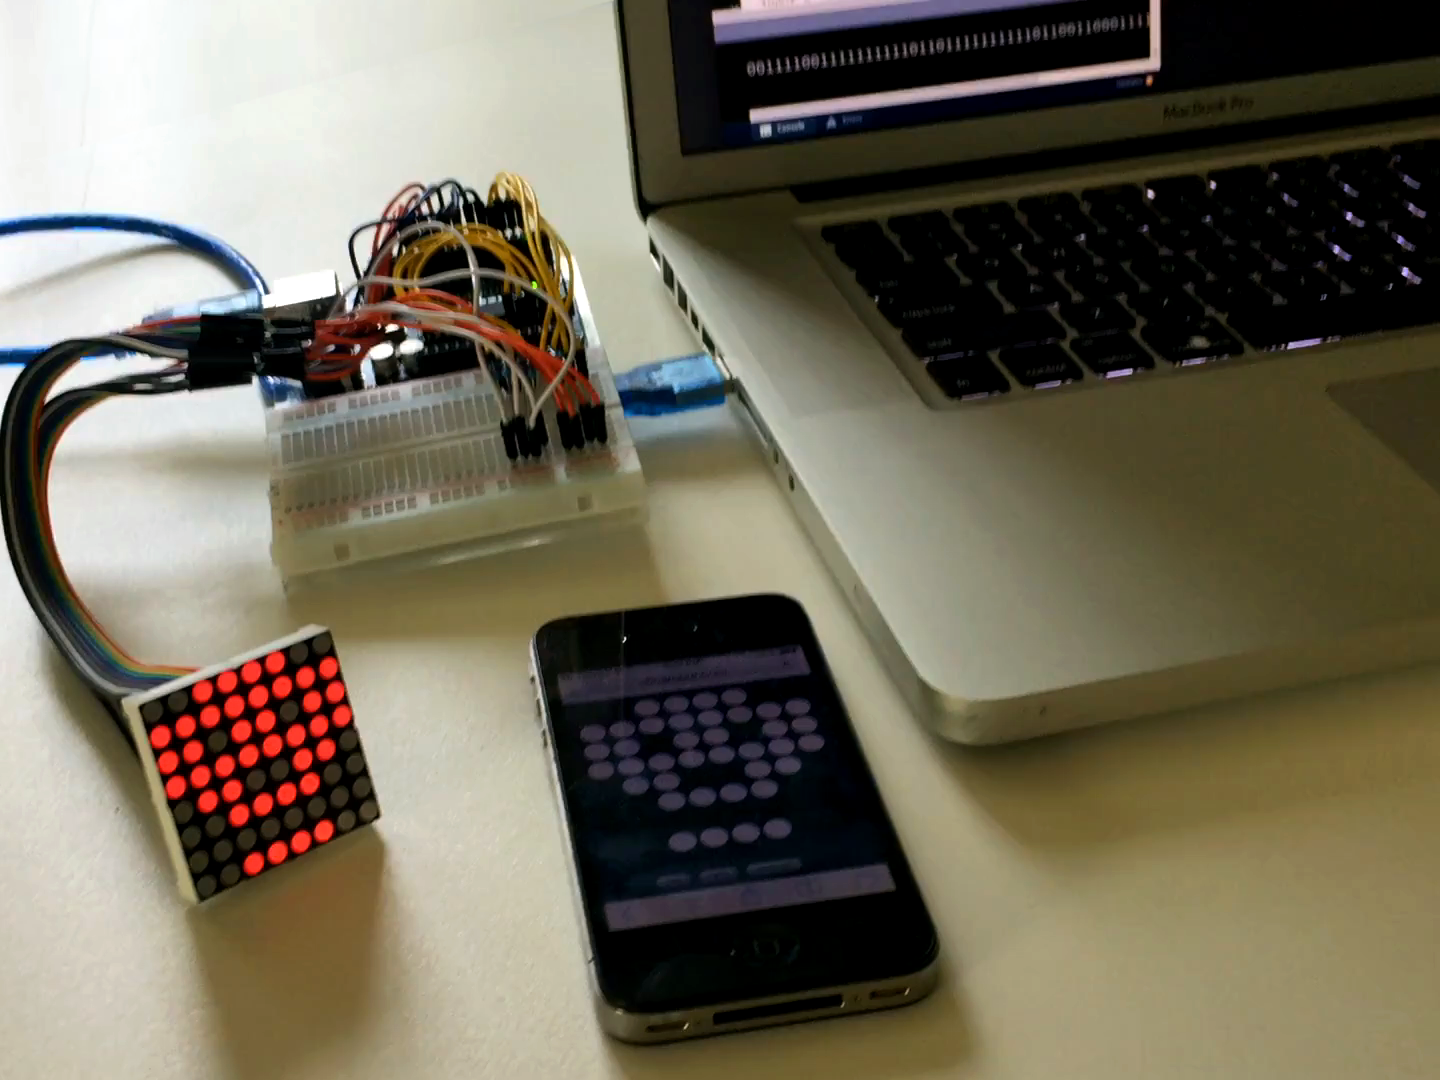
 My goal for this project was to create a web page that could control an 8×8 LED Matrix. I picked up an arduino started kit from Amazon, and initiated the project by working through the 8×8 Led Matrix Tutorial that came with the kit.
I found ygricks’s Pen ‘arduino custom chars creator‘ which was close to what I wanted to do, but not exactly. This pen uses a 5×8 grid, and I needed an 8×8 Grid. So I forked it and started tweaking the layout so that it would look better in a smartphone browser and match the look of the LED Matrix I would be using.
See the Pen Arduino 8×8 LED Controller by Troy Finamore (@findes) on CodePen.
In the LED Matrix tutorial HEX numbers are used in an array to write the LED sequencing to the matrix. Af few edits to the JavaScript in the pen I forked and I had a function that would convert the binary bits to hex. The convertHex() function is still in the CodePen file, but in the end I went back to the binary code.
Next I went back to the method I used for my Internet Controlled Arduino LED via USB which uses processing to read a text file from a web server and to load the contents into the computers serial communication port.
Since I was now sending a string of data instead of a single integer, I had to make some tweaks in the Processing sketch to test to make sure the string was changed before updating the variable in the communications port.
Then to add the code to the arduino tutorial file to read the string and control the LED Matrix. If only it were that simple. I was running into errors trying to convert a string to hex format. Thinking it would be easier to just use the binary format, I rewrote the code and tried that for a while, but still had the errors of trying to convert string to binary. After a week of frustration I decided to reach out to the arduino community but go not love there. So I started talking to other faculty with arduino experience to see if they had any ideas. Then one recommended that instead of trying to convert the string to binary, why use an if statement to test if string == “1” then set binary = 1. While this was not my final solution it did set me on the track that would eventually lead to the final solution. Back to the interwebs looking for alternative approaches that may help, I eventually found code that controls the grounding of the individual leds, now by testing the string I could control the ground and it worked!
By tweaking my JS file to remove the commas and just pull in the binary string, I could then loop through the string in the Arduino and create a multi-dimensional array similar to the structure of the matrix, then loop through that new array and control the grounding of the individual LEds.
HTML Code
<!DOCTYPE html>
<html>
<head>
  <meta charset="utf-8">
  <meta name="viewport" content="width=device-width, initial-scale=1.0, maximum-scale=1.0, user-scalable=no">
  <title>Arduino 8x8 LED Controller</title>
  <link rel="stylesheet" href="main.css">
  <script src="https://ajax.googleapis.com/ajax/libs/jquery/2.1.3/jquery.min.js"></script>
</head>
<body>
  <table width="300" height="300">
    <tr data-row="1">
      <td data-col="1"></td>
      <td data-col="2"></td>
      <td data-col="3"></td>
      <td data-col="4"></td>
      <td data-col="5"></td>
      <td data-col="6"></td>
      <td data-col="7"></td>
      <td data-col="8"></td>
    </tr>
    <tr data-row="2">
      <td data-col="1"></td>
      <td data-col="2"></td>
      <td data-col="3"></td>
      <td data-col="4"></td>
      <td data-col="5"></td>
      <td data-col="6"></td>
      <td data-col="7"></td>
      <td data-col="8"></td>
    </tr>
    <tr data-row="3">
      <td data-col="1"></td>
      <td data-col="2"></td>
      <td data-col="3"></td>
      <td data-col="4"></td>
      <td data-col="5"></td>
      <td data-col="6"></td>
      <td data-col="7"></td>
      <td data-col="8"></td>
    </tr>
    <tr data-row="4">
      <td data-col="1"></td>
      <td data-col="2"></td>
      <td data-col="3"></td>
      <td data-col="4"></td>
      <td data-col="5"></td>
      <td data-col="6"></td>
      <td data-col="7"></td>
      <td data-col="8"></td>
    </tr>
    <tr data-row="5">
      <td data-col="1"></td>
      <td data-col="2"></td>
      <td data-col="3"></td>
      <td data-col="4"></td>
      <td data-col="5"></td>
      <td data-col="6"></td>
      <td data-col="7"></td>
      <td data-col="8"></td>
    </tr>
    <tr data-row="6">
      <td data-col="1"></td>
      <td data-col="2"></td>
      <td data-col="3"></td>
      <td data-col="4"></td>
      <td data-col="5"></td>
      <td data-col="6"></td>
      <td data-col="7"></td>
      <td data-col="8"></td>
    </tr>
    <tr data-row="7">
      <td data-col="1"></td>
      <td data-col="2"></td>
      <td data-col="3"></td>
      <td data-col="4"></td>
      <td data-col="5"></td>
      <td data-col="6"></td>
      <td data-col="7"></td>
      <td data-col="8"></td>
    </tr>
    <tr data-row="8">
      <td data-col="1"></td>
      <td data-col="2"></td>
      <td data-col="3"></td>
      <td data-col="4"></td>
      <td data-col="5"></td>
      <td data-col="6"></td>
      <td data-col="7"></td>
      <td data-col="8"></td>
    </tr>
  </table>
  <div>
    <button class="on">ON</button>
    <button class="off">OFF</button>
    <button class="invert">INVERT</button>
  </div>
  <script src="main.js"></script>
</html>
CSS Code
html {
  background: #07294D;
  margin: auto;
}
td {
  width: 30px;
  height: 30px;
  background: #000;
}
.select {
  background: #FFF;
  border-radius: 100px
}

table {
  margin: 1em auto;
  padding: 1em;
  display: block;
  width: 300px;
  height: 300px;
  resize: none;
  border-spacing: 5px;
}
.export {
  height: 270px;
  border: none;
  font-family: monospace;
}
div {
  text-align: center;
}
button {
  padding: 1em;
}
JavaScript Code
var a = [];

for (var i = 1; i <= 9; i++) {
 a[i] = [];
 for (var e = 1; e <= 8; e++) a[i][e] = "null";
}

$(document).ready(function () {
 $("table").click();
});

$(".off").click(function () {
 $(".select").removeClass("select");
 $("table").click();
});

$(".on").click(function () {
 $("td").addClass("select");
 $("table").click();
});

$(".invert").click(function () {
 $("td").toggleClass("select");
 $("table").click();
});

$("td").click(function () {
 if ($(this).hasClass("select")) {
 $(this).removeClass("select");
 } else {
 $(this).addClass("select");
 }
});

$("table").click(function () {
 var t = $("table").first();
 var cols = t.find("tr");
   cols.each(function () {
   var rows = $(this).find("td");
   rows.each(function () {
     a[$(this).parent().data("row")][$(this).data("col")] = $(this).hasClass(
     "select"
     ) ?
     1 :
     0;
   });
 });
 var c = convertBin();
});

function convertBin() {
 var binaryArt = "";
 for (var i = 1; i <= 8; i++) {
   var row = "";
   for (var j = 1; j <= 8; j++) {
     row += a[i][j] + "";
   }
   row += ""
   binaryArt += row;
 }
 js2php(binaryArt);
}

function js2php(qData) {
 //console.log("js2php called " + qData);
 var xmlhttp = new XMLHttpRequest();
 xmlhttp.open("GET", "main.php?q=" + qData, true);
 xmlhttp.send();
}
PHP Code
<?php
  $q = $_REQUEST["q"];
  if ($q !== "") {
    // 170821 .. jwt .. Open, Create text file and WRITE the q parameter data to it
    $dataFileObj = fopen("ascii-art.txt", "w") or die("Unable to open file");
    fwrite($dataFileObj, $q);
    fclose($dataFileObj);
  }
?>
Processing Code
import java.util.Arrays;
import processing.serial.*;
Serial ComPort;
String input[], prev[];
String current;
String last = "0";

void setup() {
 String portName = Serial.list()[1];
 ComPort = new Serial(this, portName, 9600);
 println(ComPort);
 ComPort.bufferUntil('\n');
}

void draw() {
 input = loadStrings("url to ascii-art.txt goes here");
 current = input[0];
 if (Arrays.equals(input, prev)) {
 } else {
   ComPort.write(current);
   last = current;
   print(current + "\n\n");
   prev = input.clone();
 }
 input = null;
 delay(50);
}
Arduino Code
const int columnPins[] = { 6, 7, 8, 9, 10, 11, 12, 13};
const int rowPins[] = { 2, 3, 4, 5, 17, 16, 15, 14};
String newData, prevData, tempChar;
String displayArt[8][8];
int col = 0, row = 0;
void setup() {
  Serial.begin(9600);
  Serial.print(newData + "\n\n");
  for (int i = 0; i < 8; i++) {
    pinMode(rowPins[i], OUTPUT); // make all the LED pins outputs
    pinMode(columnPins[i], OUTPUT);
    digitalWrite(columnPins[i], HIGH); // disconnect column pins from Ground
  }
}
void loop() {
  if (Serial.available()) {
    newData = Serial.readString();
    if (newData != prevData) {
      for (int row = 0; row < 8; row++) {
        for (int col = 0; col < 8; col++) {
          tempChar = newData.charAt((row * 8) + col);
          displayArt[row][col] = tempChar;
        }
      }
      prevData = newData;
    }
  }
  show();
}
void show() {
  for (int row = 0; row < 8; row++) {
    digitalWrite(rowPins[row], HIGH); // connect row to +5 volts
    for (int column = 0; column < 8; column++) {
      if (displayArt[row][column] == "1" ) {
        digitalWrite(columnPins[column], LOW); // connect column to Gnd
      }
      //delayMicroseconds(300); // a small delay for each LED
      digitalWrite(columnPins[column], HIGH); // disconnect column from Gnd
    }
    digitalWrite(rowPins[row], LOW); // disconnect LEDs
  }
}
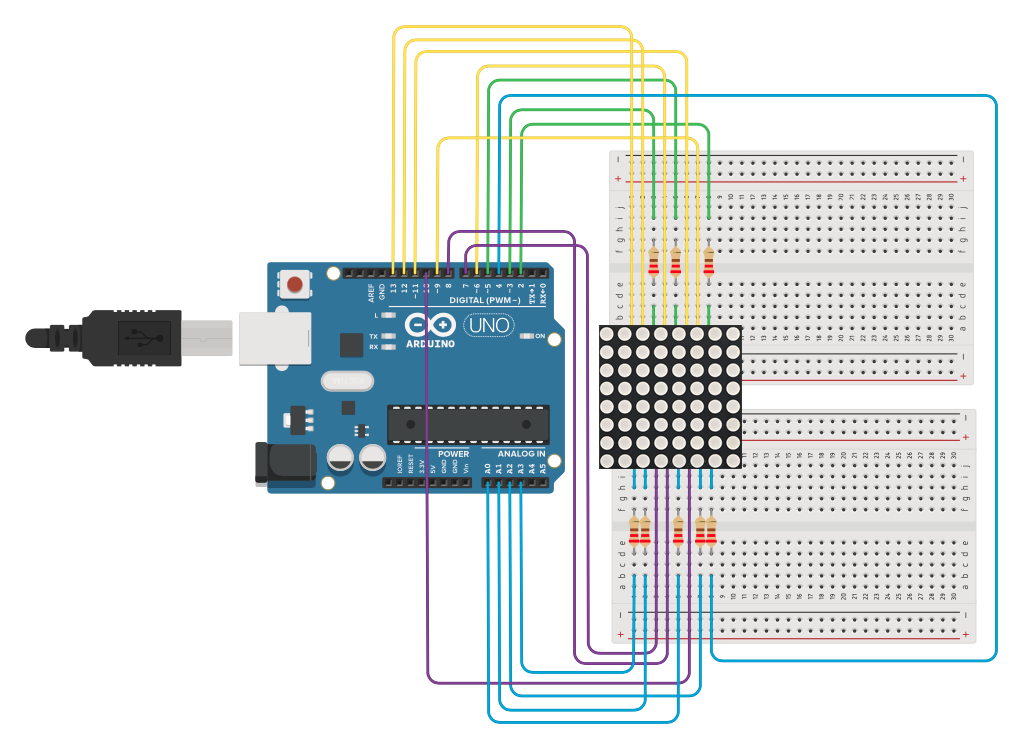
Wiring Schematic
What’s next?
Maybe add 3 more arrays so the drawing pad is 16×16? or use an RGB Led Array and add a color picker. Ada Fruit has two possibilities, an 8×8 RGB LED Pixel Matrix or the Flexible 16×16 NeoPixel RGB LED Matrix
This is also dependent upon a lot of technologies. Maybe my next step should be looking into using an ethernet shield or an Arduino Ethernet and create it as a stand alone thing.